Installation Procedures for Glacier Snow Guards
Installation ADVANTAGES for Glacier Snow Guards
- Easy to install using silicone adhesive*
- Fasteners not required for most applications.
- Molded holes provided when mechanical fasteners are desired.
- Can be used on all types of roofs including EPDM, PVC, all types of metal roofs, slate and asphalt shingles.
*Everseal SB-190 Adhesive available to order here.
Need help finding the amount of Glacier Snow Guards for your project? Use our project quote page and we'll let you know the quantity you need.
Notice on Snow Loads: A detailed commentary on snow loads from the US Army Corps of Engineers is available for download here. [PDF] A recommended read if you have any questions about snow loads in your region.
Typical Installation
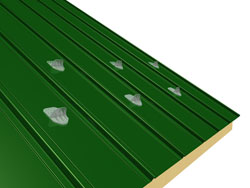 Click image for a zoomed detail view |
Step 1: Your first row; starting towards the eave above your exterior load bearing wall, place Large Snow Guards approx. 16” on Center side to side trying to maintain pattern in center of panel. Step 2: Your second row will start approx. 16” above and 8” over to the next rib. Make sure you fasten 2nd row to sheeting, roof purlin, or rafter (in case you need to reinstall). Step 3: Continue second row at 16” on center across roof width. |
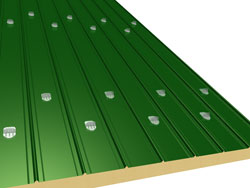 Click image for a zoomed detail view Click image for a zoomed detail view |
Step 4: Start your next row of snow guards 8 to 12 feet above previous row of snow guards. |
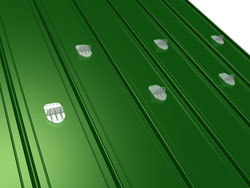 Click image for a zoomed detail view Click image for a zoomed detail view |
Step 5: Same as previous steps, place the second row 16 inches above and over from the previous snow guard. Step 6: Repeat for the width of the roof. |
Each application is unique to its specific job due to pitch, length of rafter, purpose for application, type of roofing material, etc. For an estimate on your next project, use our quantity quote page to find the right amount.
Installation Procedures for the following methods:
- Adhesive Installation on Metal Panels
- Mechanical Installation on Metal Shingles
- Mechanical Installation on Metal Panels
Installation Procedures for Adhesive Installation on Metal Panels
- Area that Snow Guard will be installed must be clean from any surface contamination. Alcohol will clean the area and will dry quickly. Area must be dry for adhesive to bond.
- Use a pencil to mark the area where the Snow Guard will be installed, no more than 12" from outside of exterior wall to help prevent ice dams. At the eaves on most roofs under 6/12 pitch, two staggered rows will be sufficient. Over 6/12 pitch, a third row must be added. If the distance from the roof edge to peak is greater than thirty feet, no matter the pitch, two additional rows should be added. Add Snow Guards to areas over doorways and around valleys for added protection. * If unsure of amount needed please contact Glacier Snow Guards.
- After marks have been made, apply enough adhesive to entire bottom of Snow Guard. Be sure to spread out adhesive evenly to assure that no air gaps will be concealed.
- Press the Snow Guard firmly into place with the shingle ledge pointed up, above the mark made in step 2. Apply enough pressure so the adhesive comes out around perimeter.
- Apply a small bead of adhesive around the perimeter of the Snow Guard to seal all edges.Clean up any excess caulk with mineral spirits or alcohol.
- Be sure to allow enough time for the adhesive to fully cure. Check with the manufacturer of the adhesive to get this information.
*M.M. Products, Inc. is not responsible for determining the structural integrity or live load capacity of any roof on which Glacier Snow Guards will be installed. This shall be done by an architect or consultant.
Be sure to double-check all installation guidelines recommended by adhesive manufacture. (Temperature range of installation, and strength of adhesive per amount of snow guards used). We do not warrant any of the adhesives recommended.
Installation Procedures for Mechanical Installation on Metal Shingles with Snow Guard SHINGLE LEDGE Technology
- Area that Snow Guard will be installed must be clean from any surface contamination.
- Install the first Snow Guard no more than 12" from outside of exterior wall and 12" from outside of gable side to prevent ice dams. Determine the position of the shingle that will cover the shingle ledge by laying it in position and marking in the center of the lower shingle. From this mark, measure up no less than 1(one) inch and no more than 1 ¼(one and a quarter) inch and place a mark, this mark is the top of the Snow Guard.
- The installer must determine the proper length, size and number of fasteners to use. The head of the fastener must be even with snow guard, if it sticks beyond the Snow Guard it could cause the fastener to push through the shingle.
- Now is the time to install the first Snow Guard. Position the top of Snow Guard at the mark made in step 2. Insert fasteners into chosen holes of Shingle Ledge on uppermost part of Snow Guard. When fastening be sure that one screw penetrate through a rafter, purlin or structural support member.
- Install the remainder Snow Guards to this row following the guidelines discussed. There should be a maximum of 24" between each Snow Guard horizontally and a maximum of 24" vertically. Stagger the next row at the midpoint of the Snow Guards below. Continue this row until reach the other side of roof. At the eaves on most roofs under 6/12 pitch, two staggered rows will be sufficient. Over 6/12 pitch, a third row must be added. If the distance from the roof edge to peak is greater than thirty feet, no matter the pitch, two additional rows should be added at the center of roof. Add Snow Guards to areas over doorways and around valleys for added protection. * If unsure of amount needed please contact Glacier Snow Guards.
- Apply sealant to top of Snow Guard to cover holes in case moisture gets under the shingles and around perimeter of snowguard..
*M.M. Products, Inc. is not responsible for determining the structural integrity or live load capacity of any roof on which Glacier Snow Guards will be installed. This shall be done by an architect or consultant.
Installation Procedures for Mechanical installation on Metal Panels.
- Area that Snow Guard will be installed must be clean from any surface contamination. Alcohol will clean the area and will dry quickly. Area must be dry for adhesive to bond.
- Use a pencil to mark the area where the Snow Guard will be installed, no more than 12" from outside of exterior wall to help prevent ice dams. At the eaves on most roofs under 6/12 pitches, two staggered rows will be sufficient. Over 6/12 pitches, a third row must be added. If the distance from the roof edge to peak is greater than thirty feet, no matter the pitch, two additional rows should be added. Add Snow Guards to areas over doorways and around valleys for added protection. * If unsure of amount needed please contact a Glacier Snow Guard sales rep.
- After marks have been made, apply enough adhesive to entire bottom of Snow Guard. Be sure to spread out adhesive evenly to assure that no air gaps will be concealed.
- Press the Snow Guard firmly into place with the shingle ledge pointed up, above the mark made in step 2. Apply enough pressure so the adhesive comes out around perimeter.
- Install screws with neoprene gasket washers through pilot holes of choice in Snow Guard and metal roof (screw must penetrate through purlin or support beam under metal roof panel). For most installations, two screws must be used in the Mini Glacier Snow Guard and 4 must be used with the large Glacier Snow Guard. Installer to determine proper length, size and number of screws necessary for required holding strength and torque.
- Apply a small bead of adhesive around the perimeter of the Snow Guard to seal all edges.
- Clean up any excess caulk with mineral spirits or alcohol.
- Be sure to allow enough time for the adhesive to fully cure. Check with the manufacturer of the adhesive to get this information.
*M.M. Products, Inc. is not responsible for determining the structural integrity or live load capacity of any roof on which Glacier Snow Guards will be installed. This shall be done by an architect or consultant.